
Increase the lifespan of your cover
When appropriate, open your pool cover at least once a week to prevent premature fabric wear and gas built up by chemicals.
Tracks
Keep your tracks clean. Far too often a service-related problem is due to dirty tracks. Save yourself the frustration and flush out your tracks with a garden hose and sprayer twice a year (more if your landscaping is not complete).
Drain Box
If possible, inspect the drain box in the recessed housing box. Keeping the drain-line and housing free of leaves and debris will keep your system working in good order.
Water Levels
Proper water levels are crucial to good cover maintenance. If water levels drop below mid-skimmer level, it places stress on the cover, webbing, ropes, and tracks. Additionally, low water levels could suggest a slow leak in your pool.
Opening and Closing your Pool Cover
While pool toys and sunscreen are staples around most pools, they don’t belong on the cover. Before opening and closing your cover, be sure to remove all pool toys and objects in and around the pool. Don’t let a pool noodle, mistakenly rolled up in your cover, be the cause of a service call.
Pool Chemistry
When shocking or super chlorinating your pool, if possible, leave your pool uncovered with the filtration operating until the chlorine reading has reached a swim safe level. *The pool should not be left unsupervised when the cover is open.
Remove Standing Water
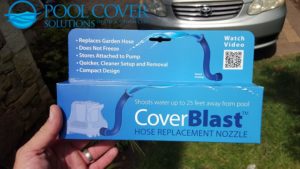
Be sure to pump off any standing water with your cover pump. Too much water sitting on your cover can damage your system or pull the cover out of the tracks.
Cover Pump Tips
Contact us today to order yours!
To learn more and see these tips in action, click here to access our Video Library.
Have you noticed your cover is brittle, faded, or developing leaks?
Over time, the sun’s UV rays above your cover and chemical degradation below your cover takes its toll.
Often this leads to your cover developing cracks or dry rotting and adding stress and unnecessary wear to your system – not to mention making your cover unsafe.
It may be time for a replacement cover.
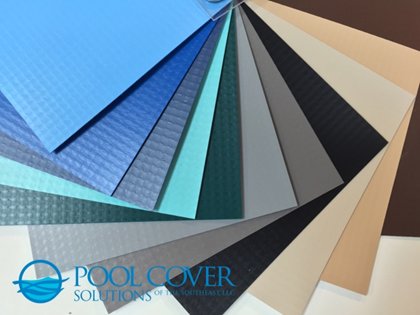
With 11 colors to choose from, we have you covered.
Do you currently have beige fabric and wonder if slate gray would better suit your pallet? Not worry, we have taken the guesswork out of it.
Try our interactive cover widget! Upload a photo of your pool and follow the prompts – Click here to get started.
Extend the life of your mesh cover and ensure that it is ready for use when it’s time to winterize your pool.
Follow these 5 easy steps and your cover will last longer and protect what matters better!

Be sure to clean the cover BEFORE you remove it.
With all the winter debris sitting on your cover, be sure to hose off, with your standard garden sprayer, the debris. No one wants all those leaves and twigs in the pool and you certainly don’t want one of those twigs possibly tearing your cover.
Remove the cover springs and screw down the anchors.
The installation rod that came with your cover is the perfect tool for removing the springs from the anchors. After all the springs are removed, take the hex key (also included with our cover) to lower the brass anchors down into the deck. *By lowering the anchors into the deck, you’ll be reducing the risk of your cover getting snagged during the removal process. *This step is important so do not bypass it.
Proper removal of the mesh safety cover.
The way you remove our cover from your pool is important for minimizing damage risks. Start at one end of the cover and fold the cover in small sections in an accordion-style until you reach the end. Then without dragging the cover, carefully remove it from the end of the swimming pool and set it on a flat clean surface.
Clean the Cover Thoroughly.
Store your winter mesh pool cover properly.

To learn more and see these tips in action, click here to access our Video Library.